목차
1. 작품 설명
2. 모델 설명
3. 웹사이트 소
4. 얼굴인식을 실행한 모습
5. 웹서버
1. 작품 설명

라즈베리 파이와 OpenCV 라이브러리를 활용한 사람 얼굴 인식 프로젝트입니다.
필요한 하드웨어 장비로는 라즈베리파이에는 카메라 모듈, 3개의 LED(빨, 파, 노) 및 저항입니다.
라즈베리 OS 환경에 OpenCV라이브러리를 설치한 뒤 얼굴을 인식해주는 라이브러리를 사용하여 사람의 얼굴을 인식합니다. 사람의 얼굴을 3가지 카테고리로 분류하는데 시스템에 등록한 사람 중 Owner와 Owner가 아닌 사람(Other) 그리고 시스템에 등록되지 않은 사람인 None으로 구별합니다. 사용자의 관리는 파일로 그 정보를 관리하도록 하였습니다.
<요약>
▶ 라즈베리 파이에 연결된 카메라 모듈로 사람의 얼굴을 비추면 얼굴을 인식한다.
▶ 웹 사이트에서 등록된 사용자라면 얼굴을 비출 시 등록된 이름을 출력해준다.
만약 등록되지 않는 사람이라면 None을 출력한다.
▶ Onwer, Other, None 이렇게 3가지 카테고리고 사람을 분류한다. Onwer와 Other인 경우는 카메라에 상에 등록된 이름을 옆 그림과 같이 출력해준다. None인 경우 unknown을 출력한다.
▶ 라즈베리 파이에 연결된 3개의 LED(빨, 파, 노)로 Owner, Other, None을 각각 출력해준다.
Onwer인 경우 -> 파란색, Other인 경우 -> 노란색, None인 경우 빨간색 LED 불을 켜준다.
2. 딥러닝 모델 설명
얼굴인식 과정은 총 3가지 단계를 거친다.
단계1. 데이터 수집
hearcasecades/haarcascade_frontalface_default.xml 파일을 사용해 카메라로 사람의 얼굴을 인식한다.
사용자 등록 버튼을 통해 30장 가량의 얼굴 이미지가 수집된다.
단계2. 학습 데이터를 통해 딥러닝 모델 생성
각 사용자는 30장의 사진 데이터를 각각 가지고 있다. 이 학습 데이터를 통해 단계1에서는 등록된 사용자의 얼굴을 구별해주는 딥러닝 모델을 생성한다.
단계3. 사용자의 얼굴을 인식한다.
등록된 사용자는 파일로 그 정보가 관리 된다. 또한 누가 owner인지 정보를 저장하는 파일이 존재한다. 이 정보에 따라 사용자의 Owner, Other, None여부를 LED 등을 통해 알려준다.
3. 웹 사이트 소개
1) 메인 화면

Python Flask를 통해 웹 서버를 구현하였고 위 사진은 메인 화면이다.
2) Owner 버튼을 클릭할 시

▶ Owner 페이지는 현재 등록된 사용자들을 가로 스크롤을 통해 보여준다. User Id와 User name필드를 가진다.
▶ 아래 Id를 입력하고 submit을 하면 Owner가 변경된다.
3) Remove 버튼을 클릭할 시
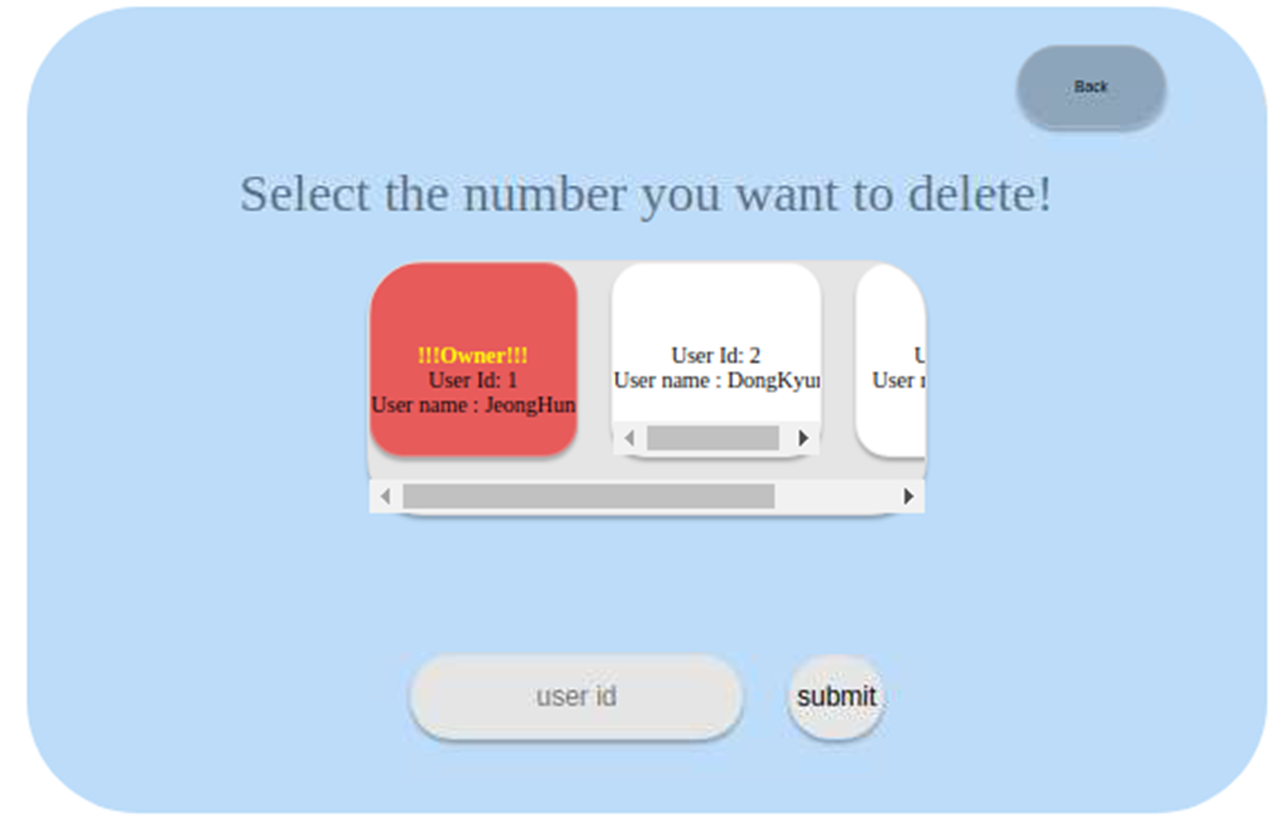
▶ 현재 등록된 사용자들을 가로 스크롤을 통해 보여준다. User Id와 User name필드를 가진다.
▶ 아래 Id를 입력하고 submit을 하면 사용자가 제거된다.
4) Registration 버튼 클릭 및 Recognition 버튼 클릭
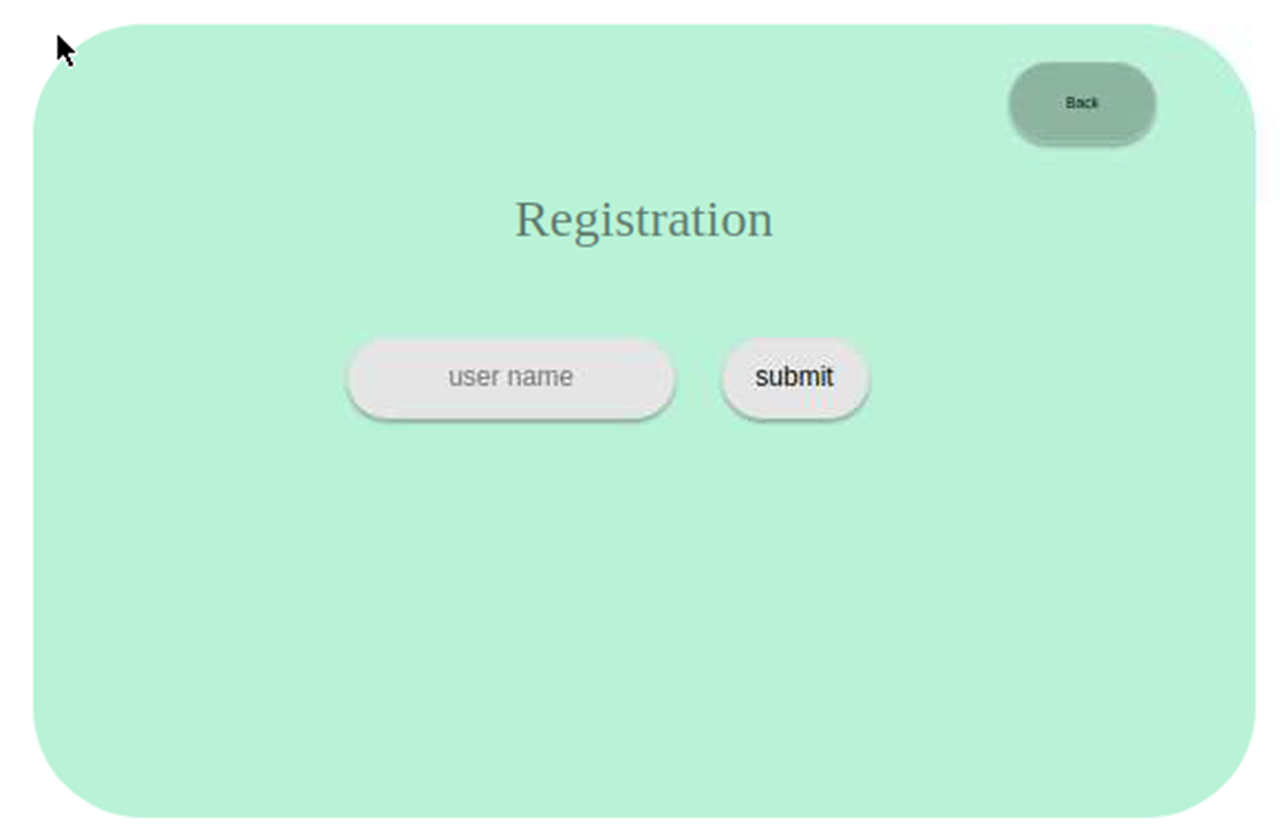
▶ 새로 등록할 사용자의 이름을 입력하고 submit을 한다.
▶ 잠시 후 카메라 화면에 나타나고 얼굴을 카메라 비추고 있으면 30장 가량의 이미지 데이터를 수집한다.
▶ 새로운 사용자가 등록된다.
▶ Recognition 버튼을 클릭하면 웹 사이트에는 변화가 없고 잠시 후 카메라가 출력되어 얼굴 인식을 시작한다.
4. 얼굴 인식을 실행한 모습
1) Face Recognition 버튼 클릭한 경우(Owner인 경우)
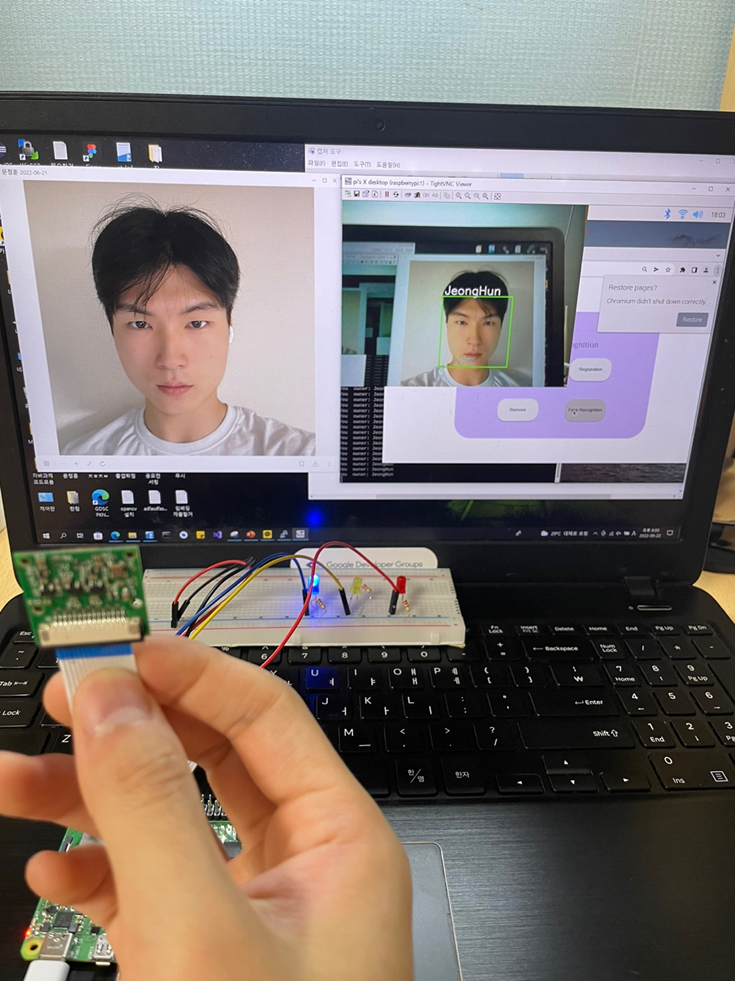
▶ 수집된 사용자 학습 데이터를 통해 딥러닝 모델을 생성한다.
▶ 잠시 후 카메라라 나오며 임의의 얼굴을 비추면 Owner, Other, None으로 분류해주고 화면에는 사용자의 이름(또는 None)을 화면상에 보여준다.
▶ Onwer인 경우 파란색LED가 켜진다.
2) Face Recognition 버튼 클릭한 경우(Ohter인 경우)
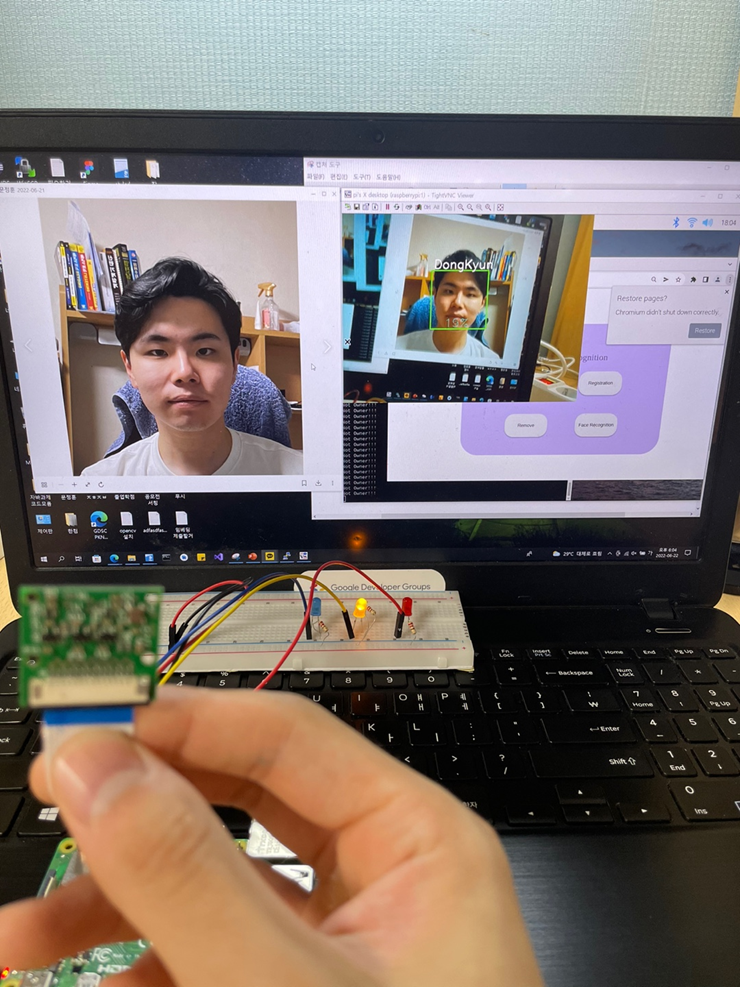
▶ 수집된 사용자 학습 데이터를 통해 딥러닝 모델을 생성한다.
▶ Ohter인 경우 등록된 이름으로 이름을 화면에 출력해주고 노란색LED가 켜진다.
3) Face Recognition 버튼 클릭한 경우(None인 경우)

▶ 수집된 사용자 학습 데이터를 통해 딥러닝 모델을 생성한다.
▶ None인 경우 등록되지 않은 사용자 이므로 화면에 None이라고 알려주고 LED로 빨간 등을 밝힌다.
5. 사용자 정보를 파일로 관리
▶ 사용자의 정보는 root 디렉토리의 하위 디렉토리에서 txt 파일로 관리된다.
▶ 왼쪽 이미지인 infor.txt은 사용자 한 명당 한 줄로 id와 이름을 공백으로 구분하여 저장한다.
▶ 오른쪽 이미지인 owner.txt 파일은 현재 누가 owner인지 id를 저장한다.
▶ 사용자의 추가 및 제거 시 infor.txt파일은 그 순서가 재조정된다.
6. 웹서버
▶ 웹서버
import cv2
import os
import numpy as np
import RPi.GPIO as GPIO
import time
from flask import Flask, redirect, url_for, render_template, request
#app = Flask(__name__, static_url_path='/static')
app = Flask(__name__)

GPIO.setmode(GPIO.BCM)
GPIO.setup(2,GPIO.OUT) # blue
GPIO.setup(17,GPIO.OUT) # yellow
GPIO.setup(7,GPIO.OUT) # red


def your_name():
	yn = txt.get()
	lbl2.configure(text="your name: "+yn)
	messagebox.showinfo("name",yn)

def f():
    os.system("python 03_face_recognition.py")
    return 1


@app.route('/')
def home():
    return render_template('index.html')

@app.route('/owner', methods=['GET', 'POST'])
def  owner():
    if request.method == 'GET':
        #Informatin data from infor.txt
        f1 = open('/home/pi/fdCam/userInformation/infor.txt', 'r')
        inforArray = [] #user inform array
        while True:
            line = f1.readline()
            if not line: break
            inforArray.append(line)
        f1.close()
        print(inforArray)

        #who is Owner?
        f2 = open('/home/pi/fdCam/owner/owner.txt', 'r')
        # if owner file is null return ''
        # if owner file  is not null reutnr <owner>\n'

        owner = f2.readline()
        f2.close()
        print(owner)
        return render_template('owner.html', inform = inforArray, ownerId = owner)

    elif request.method == 'POST':
        userId = request.form['id'] # id entered by user
        # write
        f1 = open('/home/pi/fdCam/owner/owner.txt', 'w')

        f1.write("{0}\n".format(userId))
        f1.close()
        return redirect(url_for('home'))


@app.route('/registration', methods=['GET', 'POST'])
def registration():
    if request.method == 'GET':
        return render_template('registration.html')
    elif request.method == 'POST':
        name = request.form['name'] # Name entered by user
        # Read an existing member from a file
        id = 0
        f1 = open('/home/pi/fdCam/userInformation/infor.txt', 'r')
        id = len(f1.readlines())

        sub_face_id = 0
        if  f1.tell() == 1: # tell() is current Cursor point
            f2 = open('/home/pi/fdCam/userInformation/infor.txt', 'w')
            f2.write("{0} {1}\n".format(1, name))
            sub_face_id = 1
        else:
            f2 = open('/home/pi/fdCam/userInformation/infor.txt', 'a')
            f2.write("{0} {1}\n".format(id+1, name))
            sub_face_id = id+1

        f2.close()
        f1.close

        #### Start: Collect data from new user with opencv and Create a new model!
        cam = cv2.VideoCapture(0)
        cam.set(3, 640) # set video width
        cam.set(4, 480) # set video height
        face_detector = cv2.CascadeClassifier('haarcascades/haarcascade_frontalface_default.xml')

        face_id = sub_face_id # id+1
        print("\n [INFO] Initializing face capture. Look the camera and wait ...")

        # Initialize individual sampling face count
        count = 0
        while(True):
            ret, img = cam.read()
            #img = cv2.flip(img, -1) # flip video image vertically
            gray = cv2.cvtColor(img, cv2.COLOR_BGR2GRAY)
            faces = face_detector.detectMultiScale(gray, 1.3, 5)
            for (x,y,w,h) in faces:
                cv2.rectangle(img, (x,y), (x+w,y+h), (255,0,0), 2)
                count += 1
                # Save the captured image into the datasets folder
                cv2.imwrite("faseDataSet/User." + str(face_id) + '.' + str(count) + ".jpg", gray[y:y+h,x:x+w])
                cv2.imshow('image', img)
            k = cv2.waitKey(100) & 0xff # Press 'ESC' for exiting video
            if k == 27:
                break
            elif count >= 30: # Take 30 face sample and stop video
                 break
        # Do a bit of cleanup
        print("\n [INFO] Exiting Program and cleanup stuff")
        cam.release()
        cv2.destroyAllWindows()
        #### end: Collect data from new user with opencv and Create a new model!

        return redirect(url_for('home'))

@app.route('/remove', methods=['GET', 'POST'])
def Remove():
    if request.method == 'GET':
        #Informatin data from infor.txt
        f1 = open('/home/pi/fdCam/userInformation/infor.txt', 'r')
        inforArray = [] #user inform array
        while True:
            line = f1.readline()
            if not line: break
            inforArray.append(line)
        f1.close()
        print(inforArray)

        #who is Owner?
        f2 = open('/home/pi/fdCam/owner/owner.txt', 'r')
        # if file is null return ''
        # if file  is not null reutnr <owner>\n'
        owner = f2.readline()
        f2.close()
        print(owner)
        return render_template('remove.html', inform = inforArray, ownerId = owner)

    elif request.method == 'POST':
        userId = request.form['id'] # (remove) id entered by user
        # write
        f1 = open('/home/pi/fdCam/userInformation/infor.txt', 'r')
        informations = f1.readlines()
        print(informations)
        newInformations = []
        count = 1
        exitFlag = 1
        for i in informations:
            if userId != "" and count != int(userId) and len(informations) >= int(userId) and int(userId) > 0 :
                information = i.split()
                newInformations.append(information)
                exitFlag = -1
            elif int(userId) == count:
                exitFlag = -1
            count +=1

        print('hello')
        print(exitFlag)
        if exitFlag == 1:
            return redirect(url_for('home')) # It's case of no users

        else:
            print(newInformations) # this variable is new users for the old users
            count2 = 0
            for i in newInformations: #The process of matching the user's id from 1 to 1
                newInformations[count2] = str(count2 + 1) + " " + newInformations[count2][1]+"\n"
                count2 +=1
            print(newInformations)
            f1.close()

            f2 = open('/home/pi/fdCam/userInformation/infor.txt', 'w')
            for i in newInformations:
                f2.write(i) # Update user file information
            f2.close()

            #user face dataset remove!!
            for i in range(1, 31):
                os.remove('/home/pi/fdCam/faseDataSet/User.{0}.{1}.jpg'.format(userId, i))

            #All file name upadate
            for i in range(int(userId) + 1, len(newInformations) + 2):
                for j in range(1, 31):
                    os.rename('/home/pi/fdCam/faseDataSet/User.{0}.{1}.jpg'.format(i, j),'/home/pi/fdCam/faseDataSet/User.{0}.{1}.jpg'.format(i-1, j))

            return redirect(url_for('home'))

@app.route('/face_recognition')
def Face_Recognition():
    os.system("python 02_face_training.py")
    recognizer = cv2.face.LBPHFaceRecognizer_create()
    recognizer.read('trainer/trainer.yml')
    cascadePath = "haarcascades/haarcascade_frontalface_default.xml"
    faceCascade = cv2.CascadeClassifier(cascadePath);
    font = cv2.FONT_HERSHEY_SIMPLEX

    #iniciate id counter
    id = 0

    # names related to ids: example ==> loze: id=1,  etc
    # add to array of user name
    names = ['None']
    f1 = open('/home/pi/fdCam/userInformation/infor.txt', 'r')
    inforArray = [] #user inform array
    ownerID = 0
    while True:
        line = f1.readline()
        if not line: break
        inforArray.append(line)
    f1.close()
    print(inforArray)

    for i in inforArray:
        names.append(i.split()[1])
    print(names)
    f1.close()

    f2 = open('/home/pi/fdCam/owner/owner.txt', 'r')
    ownerID = f2.read(1) # not owner-> '\n'
    if ownerID == '\n':
        ownerID = -1
    else:
        ownerID = int(ownerID)
    print(ownerID)
    f2.close()

    # Initialize and start realtime video capture
    cam = cv2.VideoCapture(0)
    cam.set(3, 640) # set video widht
    cam.set(4, 480) # set video height

    # Define min window size to be recognized as a face
    minW = 0.1*cam.get(3)
    minH = 0.1*cam.get(4)

    recog_flags = -1
    while True:
        ret, img =cam.read()
        img = cv2.flip(img, 1) # Flip vertically
        gray = cv2.cvtColor(img,cv2.COLOR_BGR2GRAY)

        faces = faceCascade.detectMultiScale(
            gray,
            scaleFactor = 1.2,
            minNeighbors = 5,
            minSize = (int(minW), int(minH)),
           )

        for(x,y,w,h) in faces:
            cv2.rectangle(img, (x,y), (x+w,y+h), (0,255,0), 2)
            id, confidence = recognizer.predict(gray[y:y+h,x:x+w])
            # Check if confidence is less them 100 ==> "0" is perfect match


            if (confidence < 100):
                id = names[id]
                confidence = "  {0}%".format(round(100 - confidence))
                if(names.index(id) == ownerID):
                    print('You  owner: ' + id)
                    GPIO.output(2,True)   # Blue LED ON
                    GPIO.output(17,False) # yellow off
                    GPIO.output(7,False)  # red off
                else:
                    print('Not Owner!!!')
                    GPIO.output(2,False)   # Blue LED off
                    GPIO.output(17,True) # yellow ON
                    GPIO.output(7,False)  # red off
            else:
                id = "unknown"
                confidence = "  {0}%".format(round(100 - confidence))
                print('who are you?')
                GPIO.output(2,False)   # Blue LED off
                GPIO.output(17,False)  # yellow off
                GPIO.output(7,True)    # red ON

            cv2.putText(img, str(id), (x+5,y-5), font, 1, (255,255,255), 2)
            cv2.putText(img, str(confidence), (x+5,y+h-5), font, 1, (255,255,0), 1)

        cv2.imshow('camera',img)
        k = cv2.waitKey(10) & 0xff # Press 'ESC' for exiting video
        if k == 27:
            break
    # Do a bit of cleanup
    print("\n [INFO] Exiting Program and cleanup stuff")
    cam.release()
    cv2.destroyAllWindows()

    GPIO.output(2,False)
    GPIO.output(17,False)
    GPIO.output(7,False)
    return redirect(url_for('home'))

@app.route('/gohome', methods=['GET', 'POST'])
def Gohome():
    if request.method == 'POST':
        return redirect(url_for('home'))

if __name__ == '__main__':
    app.run()
7. 실행 영상
'전공 > 인공지능(입문)' 카테고리의 다른 글
| 1. Teachable Machine - 마스크 착용 인식 모델 (0) | 2022.05.24 |
|---|